Best Photos for Dice Art: Pick, Crop and Tune
The best photo for dice art has one subject, cropped tight, on a plain background, with real contrast between light and dark. Resolution barely matters. Grid size and dice colour decide the rest.
What works, in short
A dice portrait has twelve shades and no colour. Every pixel of your photo becomes part of one die, so a 50-row piece has 2,500 "pixels" to describe a face. Photos that work are the ones that still make sense at that size: a close face, a strong silhouette, a pet against a plain wall. Photos that fail have the subject small in the frame, a cluttered background, or soft, even lighting that leaves everything mid-grey. The dice art guide explains the twelve-shade scale; this page is about choosing and preparing the photo that goes into it.
Crop tighter than you think
Crop tighter than feels natural. In a normal portrait the face might fill a third of the frame. In dice, that third becomes a few hundred dice, and the eyes end up two dice wide. Crop so the head fills most of the frame, chin near the bottom edge, a little space above the hair. You can lose the ears. Nobody misses the ears.
The editor's crop step offers five shapes: square, 3:4 and 2:3 portrait, 4:3 landscape, and 16:9. Square and 3:4 suit single faces. Use a wide crop only when the subject is wide too, such as two people side by side. The crop shape also sets how many columns you get for a given row count, so choose a grid size with the crop in mind: a 3:4 crop at 60 rows is 45 columns and 2,700 dice.
One subject, plain background
One face, one pet, one object. Two faces split the dice between them and each gets half the detail; a group of four at 50 rows is four blurs. If you want a couple, go to 80–100 rows or build two pieces.
The background matters as much as the subject. A plain wall, a sky, or a dark room becomes a flat field of one or two die faces, and the subject stands out against it. Trees, bookshelves and patterned fabric become noise in the same shades as hair and skin, and the edge of the face disappears into them. If the background is busy, crop it out or pick a different photo. You cannot blur it away with the sliders.
Contrast is the whole game
Dice cannot show subtle tone. The scale has twelve steps, and the middle ones (a black die with many pips, a white die with many pips) look similar from a distance. A photo that lives in that middle range comes out flat. A photo with real darks and real lights uses the ends of the scale, where black and white dice differ most, and reads from across the room.
- Side lighting from a window puts one half of the face in shadow. That shadow is what shapes the nose and cheek in dice.
- Dark hair on a light background (or the reverse) draws the outline for you.
- Flat, even light such as an overcast day or a camera flash straight on gives a face with no shadows, and the dice have nothing to describe.
- Black-and-white film-style photos with deep shadows are ideal. Convert yours to greyscale first to see what the dice will see.
The contrast slider in the editor can stretch a flat photo, but it stretches the noise too. Start with contrast in the photo, then use the slider to fine-tune.
Why low resolution is fine
You do not need a sharp photo. The generator does not pick one pixel per die; it averages every pixel that falls inside the die's cell into one brightness value, weighting partial pixels at the edges by how much of them is inside. A 50-row piece from a 1,000-pixel-wide photo averages 400 pixels into each die. A blurry old scan, a screenshot, or a phone photo from ten years ago all have more than enough information. What a low-resolution photo cannot survive is the crop: if the face is 60 pixels wide in the original, cropping to it leaves about one pixel per die, and the averaging has nothing to smooth. So the rule is: resolution does not matter, but the face must have more pixels across than your grid has columns.
How grid size changes the result
Rows set the detail, from 20 to 120. More rows mean more dice, a bigger piece, and a longer build, so the question is the fewest rows at which your photo still reads.
| Rows (square crop) | Dice | What survives |
|---|---|---|
| 30 | 900 | The shape of a head, hair against background, dark eye sockets. A face you know is recognisable; a stranger's is not. |
| 60 | 3,600 | Eyes, nose and mouth as distinct features. Expression. Most single portraits live here. |
| 100 | 10,000 | Fine hair, teeth, glasses frames, two faces. Reads from close up as well as across the room. |
A trick: look at the preview from the far side of the room, or shrink the browser window until the preview is the size of a stamp. If you can tell who it is, the grid is big enough. The dice art examples in the gallery list the grid each piece used.
Black, white or both
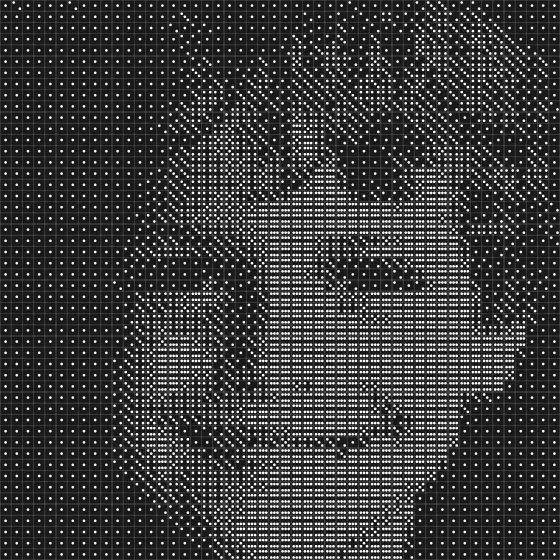
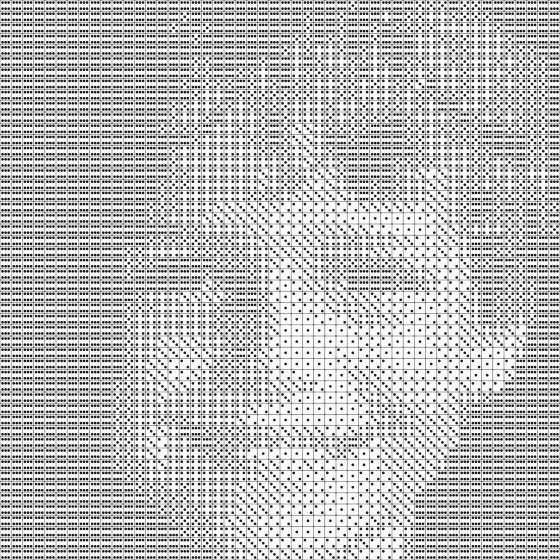
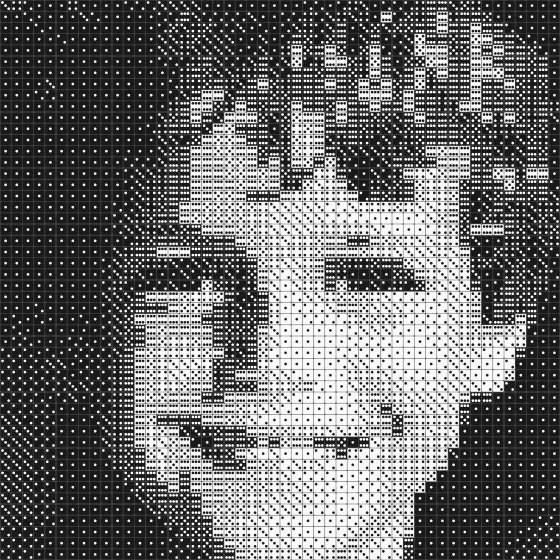
The editor offers three colour modes. Both uses black and white dice for 12 shades. Black only and white only use one colour for 6 shades each. Here is one photo, one grid, three modes:
6 shades
6 shades
12 shades
Black-only pieces are dark and moody: a black die showing six pips is still mostly black, so the lightest tone available is a dark grey. Some people like that look for a dramatic portrait. White-only comes out pale for the opposite reason. Both together cover the range, and that is what makes a face read. Pick "both" unless you want the effect on purpose.
Tune before you commit
Once the crop is right, the tune step has four sliders and a few toggles. Work in this order:
- Rows: the smallest number at which the face still reads.
- Contrast: push until the darks are solid black dice and the lights are solid white, then back off a notch before the midtones vanish.
- Brightness: shifts the whole image lighter or darker. Use it to fix a photo that is all dark dice, or to bring a shadow side back.
- Sharpening: a little makes edges crisper at low row counts; too much speckles flat areas.
- Rotate 6, 3, 2: turn those faces 90° to change the texture of flat regions. Taste, not accuracy.
Watch the black and white counts under the preview while you tune; they are what you will buy. Then start building, or open the dice art generator with a new photo and compare.
Try your photo
Upload it, drag the crop, and watch the dice preview update. If the face reads at 50 rows, it will read on the wall.
Open the dice art generator